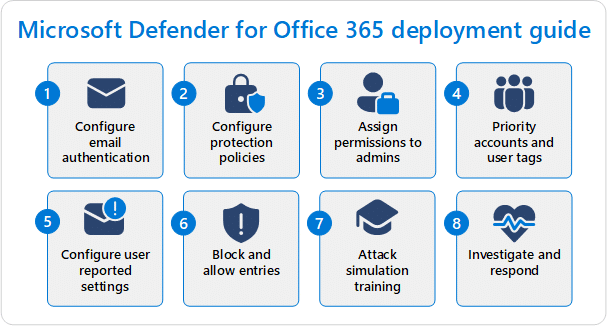
Are you tired of sifting through a sea of spam emails flooding your inbox? Fret not, for Microsoft Office 365 has your back with strong spam protection features, powered by Exchange Online filters. We will be delving into the depths of Office 365 spam protection, uncovering the secrets to keeping your inbox clean and your productivity soaring.
What is Spam?
Firstly, let’s decode what exactly spam is. Spam emails are like unwanted guests crashing a party – they’re unsolicited messages cluttering your inbox, often promoting dubious products, phishing for personal information, or spreading malware. I am sure that everyone has experienced these!
SPAM is taking e-mail, which is a wonderful tool, and exploiting the idea that it’s very inexpensive to send mail. – Bill Gates
Microsoft Office Spam Filters
Office 365 employs sophisticated mail spam filters, leveraging the power of Exchange Online, to shield your inbox from these malicious intruders. These filters act as vigilant gatekeepers, scanning every incoming email with eagle-eyed precision.
How Do Office 365 Spam Filters Work?
Imagine Exchange Online spam filters as diligent sentinels stationed at the entrance of your inbox fortress. They analyze each email’s content, sender reputation, and other key factors to determine its legitimacy. Suspicious emails are swiftly quarantined or flagged, sparing you from potential harm.

1. How do I retrieve legitimate emails that gets caught?
If a legitimate email gets caught in your Office 365 spam filter and ends up quarantined or flagged, you can usually retrieve it easily. Here’s what typically happens:
Quarantine:
Quarantined emails are held in a separate area from your main inbox. Just to prevent it from causing harm that it may cause. Here are steps to retrieve a quarantined email:
- Log in to your Office 365 account.
- Navigate to the quarantine area, which is usually accessible through the Exchange admin center or Security & Compliance Center.
- Review the list of quarantined emails.
- Select the email(s) you want to release.
- Choose to release them to your inbox or mark them as not spam.
Flagged Emails:
Sometimes, emails are not fully quarantined but are marked as potential spam or flagged for your attention. To handle flagged emails:
- Check your junk or spam folder in your email client. Sometimes flagged emails are automatically diverted there.
- If you find the email in the junk or spam folder, you can typically mark it as “Not Junk” or “Not Spam” to move it back to your inbox.
- Add the sender to your contacts or safe sender list to prevent future emails from being flagged.
Additionally, you can work with your organization’s IT support or Office 365 administrator. They can provide guidance specific to your organization’s setup and policies.
If you are however not an admin and only want your legitimate email released, it is as easy as 1-2-3. Watch this explainer video from Microsoft: Requesting Emails from Quarantine

Configuring Your Office 365 Spam Protection Settings
Now, let’s roll up our sleeves and customize our defenses. Microsoft Office 365 offers a plethora of options to fine-tune your spam protection settings. From tweaking filter sensitivity to managing safe senders and blocked domains, you’re in full control of your inbox’s destiny.
1. What You Need
- Sufficient permissions (Security Administrator role)
- 5 minutes to perform the procedures.
2. How do I know if my Microsoft Licenses includes Defender?
To determine if your Microsoft Office license includes online filters and Defender, you can follow these steps:
- Check your License Details: Review the details of your Microsoft Office license. This information should be available either in the email or documentation you received when you purchased the license, or through your Microsoft account if you bought it online. Look for any mentions of online filters or Defender being included.
- Review Product Features: Visit the official Microsoft Office website and review the features included in your specific version of Office. Look for any mention of online filters or Defender among the features listed for your version.
- Contact Microsoft Support: If you’re unsure about the details of your license or if it includes specific features like online filters and Defender, you can contact Microsoft support directly. They can provide you with detailed information about your license and what features are included.
- Explore Installed Applications: If you already have Microsoft Office installed on your computer, you can explore the installed applications to see if any tools or features related to online filters or Defender are present. For example, you can check if there are any security options or settings related to Defender within the Office applications.
Remember that the availability of features can vary depending on the specific version and subscription plan of Microsoft Office you have. If you’re still unsure after checking these steps, reaching out to Microsoft support would be the best way to get clarification.
3. How to configure quarantine permissions and policies.
Configuring quarantine permissions and policies typically involves setting rules and procedures to isolate potentially harmful or suspicious files, emails, or other digital content. Below is a rough guide on how to configure them.
1. Define the Scope:
Determine what types of content you want to quarantine. This could include email attachments, files downloaded from the internet, or any other content that enters your organization’s network.
2. Choose a quarantine solution:
Decide on the software or platform you’ll use to manage quarantined items. Many email servers and cybersecurity software solutions offer built-in quarantine features.
3. Access quarantine settings:
Log in to your chosen quarantine management platform or software. Access the settings or administration panel where you can configure quarantine permissions and policies.
4. Set user permissions:
Determine who within your organization will have access to quarantine management. Typically, this includes IT administrators or designated security personnel. Assign appropriate permissions to ensure that only authorized users can view, manage, or release quarantined items.
5. Configure quarantine policies:
- Define criteria for quarantine: Establish rules and criteria for what triggers content to be quarantined. This could include specific file types, keywords, sender domains, or other indicators of suspicious or malicious content.
- Specify quarantine actions: Decide what actions should be taken when content meets the quarantine criteria. Options may include blocking the content entirely, moving it to a separate quarantine folder, or notifying administrators for further review.
- Set retention policies: Determine how long quarantined items should be retained before they are automatically deleted or released. Retention periods may vary depending on your organization’s compliance requirements and security policies.
- Configure release procedures: Define the process for releasing items from quarantine. This may involve manual review by administrators, automated scanning for threats, or user-initiated release requests.
6. Test and refine:
Before deploying your quarantine policies in a production environment, conduct thorough testing to ensure they function as intended. Fine-tune your policies based on feedback and testing results to optimize effectiveness and minimize false positives.
7. Deploy and monitor:
Once you’re satisfied with your quarantine configurations, deploy them in your production environment. Monitor quarantine activity regularly to identify any issues, adjust policies as needed, and ensure ongoing effectiveness in detecting and isolating potential threats.
8. Educate users:
Provide training and awareness programs to educate employees about the importance of quarantine policies and how to recognize and report suspicious content. Encourage users to follow best practices for email and internet security to minimize the risk of encountering harmful content.

Here’s a Story about Sarah’s Triumph Over Spam
Meet Sarah, a diligent professional drowning in a deluge of spam emails daily. Frustrated by the constant distraction, she decided to harness the power of Microsoft Office 365 spam protection. By configuring her spam filter settings and educating her team on phishing awareness, Sarah transformed her inbox into a sanctuary of productivity. With Exchange Online filters as her steadfast allies, she reclaimed her time and focus, propelling her career to new heights.
Best Practices for Office 365 Spam Protection
To maximize the efficacy of your spam protection, here are some golden rules to abide by:
- Regularly review your spam filter settings to ensure they align with your evolving needs.
- Educate yourself and your team on identifying phishing attempts and other common spam tactics.
- Stay vigilant and report any suspicious emails promptly to your IT department.
- Embrace the power of collaboration – share insights and experiences with your colleagues to bolster your collective defense against spam.
To Conclusion: Empower Your Inbox with Office 365 Spam Protection
In the relentless battle against spam, Office 365 stands as a formidable fortress, armed with Exchange Online filters to safeguard your inbox. By understanding the nuances of spam and harnessing the full potential of Office 365 spam protection, you can reclaim control over your digital workspace and unleash your productivity prowess. So, arm yourself with knowledge, fortify your defenses, and let Office 365 be your trusted shield against the scourge of spam.


Related Posts